Showing all posts tagged legacy:
Occasionally it is necessary to add a comma to every line of text, I have found this necessary when I have a list of items which I want to turn into a large number of tags for use in Evernote. I looked around for a way to do this and worked out a very easy way of doing it using the BBEdit text editor which I use on my Mac, the process is very simple.
Starting with the text document (probably an exported list from a spreadsheet) opened in BBEdit, you have your list of items which might look something like:
Fred Bloggs
Bill Smith
Sadie Stern
Jack Jones
Archie Enemy
Simply selet all the text using either your mouse, trackpad or the cmd-a keyboard shortcut. Then in the BBEdit menu select "Text" then "Prefix/Suffix Lines" and in the pop-up that opens select the "Insert" radio button and put a comma in the suffix box and click "OK".
Hey presto it's done, a comma appears at the end of every line.
Fred Bloggs,
Bill Smith,
Sadie Stern,
Jack Jones,
Archie Enemy,
At this point I often want to convert this list into a string of text with each name, or whatever the text is, separated by a comma, I also do this using BBEdit. Simply select the text you want to convert and then select from the BBEdit menu "Text" and then "Remove Line Breaks" and you will then have a comma separated list as below.
Fred Bloggs, Bill Smith, Sadie Stern, Jack Jones, Archie Enemy,
With long lists the above simple process can save hours! When pasted into the Tags field of an Evernote note you can create any number of tags at one time, avoiding a lot of typing, and these can then be selected to be applied to other notes.
From iPhone Contacts to Google Contacts
Transferring a number of contact records from an iPhone into Google Contacts can be a bit of a pain as the iPhone does not offer a way of easily extracting a batch of contact details in one fell swoop. I needed to get quite a few contacts from an iPhone into Google Contacts and to do this I ended up doing the following using my Mac:
- Export individual contacts from the iPhone by "sharing" them one at a time, this generated a series of vCard (.vcf) files.
- Save all the .vcf files into a single folder.
- Open a Terminal window and navigate to the folder where the .vcf files are stored.
- Enter the following Terminal command: cat *.vcf > combined.vcf
- This generates a single .vcf file called "combined.vcf" - or whatever name you choose to give your file.
- Using the Import feature in Google Contacts import the "combined.vcf" file.
- This process will generate all the individual contacts as individual Google Contact records which can then be edited.
Whilst having to export the contacts from the iPhone individually was a bit of a nuisance the approach above saved me a lot of time in terms of the import process and gave me control of the new contacts as they were initially auto-tagged with a label "Imported On ddmmyyyy" which made the group very easy to work on.
Evernote and Tresorit
I've been using Evernote for years now and have many thousands of notes stored in the Evernote ecosystem. Evernote is my go-to application for storing all sorts of things from short notes to scanned documents and images and pretty much everything that comes in a digital format or that can be converted into one. Basically my life has been scanned and much of the paper I previously had has made it's final journey to the shredder.
I've always felt that Evernote was pretty secure but from time to time I have had niggling concerns that even though my Evernote data is stored encrypted on Google's servers I am not actually in control of my own encryption keys, Google is. In theory at least it is therefore possible for my material to be accessed by someone other than myself. In fact the plain text versions of my data MUST be accessible at least at some point in order for the data in my Evernote account to be indexed to allow word searching of my Evernote account to take place.
All this got me thinking and I decided that I would feel happier if I did not depend completely on Evernote to retain my privacy but took some additional steps myself. These thoughts coincided with my selecting Tresorit as my preferred cloud storage provider, my primary reason for selecting Tresorit is that it offers true end-to-end zero knowledge encryption. I, and I alone, am in control of the encryption of my data and the passwords used to perform that encryption. The price I pay for this is that if I lose the keys that's my problem and my data is lost and I am fine with this.
Thinking through the contents of my Evernote account it really falls into two categories:
Category 1 - Data that I would be extremely unhappy if it found it's way into the public domain but which needs to be stored securely and safe from natural disasters. This might include some financial information, health information, scans of important legal documents, personal letters, these kinds of things.
Category 2 - Pretty much everything else. This might include lots of file notes, non-critical records of events, information relating to hobbies, old receipts, newspaper clips and sundry other items retained in digital form where the original papers have long since been shredded. These are items I have kept that I don't want to lose but if they appeared on a website somewhere I could live with it!
It seems to me that the number of items that would be identified as Category 1 items are pretty few and far between and they can easily be identified. More importantly the items falling into Category 1 are actually very infrequently accessed and when they are required the need is never urgent. I have therefore decided upon the following strategy.
All Category 1 items are gathered together and using the export feature built into Evernote these notes are exported to create a single *.enex archive file which preserves all the notes, attachments, links and tags relating to each individual note. All the Category 1 notes are then deleted from my Evernote account, this removes any possibility of these notes being accessed.
Having obtained this single *.enex archive file containing all the sensitive information Tresorit comes into it's own. This file is then uploaded to the Tresorit cloud storage system, it is encrypted before leaving my own system and remains encrypted on the Tresorit servers (AES-256 Encryption) where it cannot be accessed by anyone, only I have the keys. If I need the information within these Category 1 notes it is simplicity itself to download the *.enex file from Tresorit and import the notes into Evernote where they then appear in their original format.
Using this approach I retain the convenience of the Evernote system but have the security of knowing that my truly important documentation is protected by the advanced security arrangements offered by the Tresorit service. It is of course also very convenient to export ALL the notes from my Evernote account into a single *.enex archive file and upload that to Tresorit simply as a backup for the whole Evernote system.
This approach also does away with the local storage of any sensitive information on either my local machine or in any local backups, the ONLY records are those residing on the Tresorit servers, which are fully encrypted.
Tresorit - Working With The 10GB File Size Limit
I recently started using Tresorit as my chosen cloud storage system. I chose it not because of it's price (it is a relatively expensive option) but because my most important selection criterion was security and secondly I wanted a system with a clean, modern, understandable interface. Above all else the system had to offer Zero Knowledge End To End Encryption as well as Two Factor Authentication at the login stage. Tresorit delivers what I wanted.
That said there are always issues to be dealt with when adapting one's workflow to a new system and this short posting covers just one of them, that is how I have decided to deal with the 10GB file size limit, for a single file, imposed by the Tresorit system. It is necessary for me, and I suspect others, to work with this limitation because I frequently have to deal with blocks of data which are larger than this limit, or aggregated chunks of data - in particular large video files. The solution I am using relates only to Mac users because that is the platform I use myself, Windows users will I am sure have their own solutions.
To store a file or a collection of data larger that 10GB on the Tresorit system I first create a disc image of a single folder which contains all the files to be stored and then split that file into segments for uploading, each segment being below the 10GB upload limit. Normally in my case this would be a folder containing files called something like "20120823TripToTheLakes" which will contain all the photos and video files from a trip, the folder may well be tens of GB in size.
To produce a disc image, or .dmg file, it is easiest to use the Disk Utility programme provided as part of the Apple suite of programmes, the programme is found under "Applications", "Utilities", "Disk Utility.app". With that running the easiest thing to do is select "File", "New", then "Disc Image From Folder" from the drop-down menu. Then navigate to the folder containing your files and click "Image". Then give the new file a name and select where you want it to be saved. Because we want to subsequently split this file you should select "Read Only" as the image format. I do not bother in this context encrypting the disc image because the Tresorit system will in any event encrypt the files locally before uploading to the Tresorit servers.
Once those options have been selected click "Save" and the process of generating the .dmg file will commence and when finished you will be able to navigate to the file and mount it as a "drive" should you wish to do so.
This single .dmg file will be a large file which then needs to be split into upload-friendly chunks, I make each "chunk" about 4GB and this is done using a Mac utility called "hdiutil" which is run using the "terminal" application which is found alongside the disk utility application. The Terminal command below, obviously with the names and locations changed accordingly, should be run and this will generate files with the extension .dmgpart with each file being about the size specified as well as a single file with the .dmg extension, all these files will have the same name apart from the file extension.
Sample Command:
hdiutil segment -o /Users/Username/Desktop/"Destination Folder"/Destination File Name -segmentSize 4000M /Volumes/DriveName/"Source Folder Name"/"SourceFileName.dmg"
I have used 4000MB in this example which is convenient for many situations and ensures that each file is not too large, if need be one could even write each one of these files to a DVD at some point. If I ever were to want to write DVD versions I tend to change this setting so that data is distributed evenly over the minimum number of disks I can use. Setting a segment size of 4000M(B) will yield a file size slightly larger than 4GB, normally 4.19GB, which is as large a single file as I tend to write to a DVD. A segment size setting of 4500M(B) will yield a single file size of around 4.72GB which is too large a file to reliably write to a single DVD and I like to leave some space as this tends to reduce read.write errors.
Once all the files have been generated by the Terminal command they can all be uploaded to the Tresorit servers without encountering any issues with the 10GB file size limit. If the files ever need to be retrieved from the Tresorit archive it is a simple matter to download them in the usual way and this is where I think it gets really clever. You simply download the "set" of files you require that made up the original file and save these into a folder on your local machine. You then just open (double click) on the first "master" file of the set, the one in the set with the .dmg extension, you can then view all the files as if you were looking at a single file or drive, there is no need to open the other files, they are all just treated as a single file, as if by magic.
If for some reason you did want to re-generate a single .dmg file from the set of .dmgpart files do this: After mounting the disk image using the multipart set, select the disk using the disk utility programme and then select "New Image", provide a name and location etc. and this will create a new single image file from the multipart image.
I hope that's been helpful, it certainly allows me to upload files of folders well in excess of the 10GB file size in a very convenient and above all secure way.
Evernote vs Apple Notes
I've been using Evernote for a number of years and probably have about 8000 notes in there now. Having pretty much now ditched paper I've always been rather concerned when I've considered the possibility of Evernote going under, as has been talked about in some circles at various points.
With this thought in mind I reckoned it might be safer to have an alternative up and running and it seems reasonable, as a user of Apple products, to try the Apple Notes application to see whether it really is a viable alternative for me.
Without too much trouble I managed to get all my notes exported from Evernote and then imported the notes into the Apple Notes application. At the present time I'm running both systems in parallel which to be honest has been surprisingly simple and takes up very little additional time, I like knowing that everything is sitting safely in an alternative system.
This is obviously not an in depth review but I thought it might be helpful to list a few points as they crop up, where Apple Notes falls short of the dedicated Evernote service. Evernote was always going to be more feature rich (some would say bloated!), and in the end it comes down to whether you can live without those extra features and whether Apple Notes will be adequate for your needs.
Here are the points I've noted so far where I've found things "missing" when using Apple Notes.
- Apple Notes cannot publish individual notes to The Web, I find the ability to create a public URL to share a note online quite handy.
- Cannot change dates of notes in Apple Notes, this is a useful feature to have when storing dated material as attachments where you want to retain the original date.
- Cannot share whole notebooks with another user, or share groups of notes when using Apple Notes.
- I like the Evernote Web Clipper, nothing comes close in Apple Notes.
- Apple Notes does not allow you to "tag" notes to allow notes to be grouped in this way.
- Apple Notes does not support searching within the contents of attached files such as PDFs, I find this very useful.
- Apple Notes does not allow you to share a note as "read only" - if a note is shared the share recipient can edit the note.
- Apple Notes does not have the "AI" sensation offered when Evernote "surfaces" similar material with it's "Context" feature.
- I like the ability to link an Evernote notebook to the Postachio service which allows me to use Evernote as a blogging platform, that is how this weblog posting was written.
Those are just some of my initial observations. I like these features in Evernote but I "could" live without them and if Evernote crashes and burns it's good to have an alternative ready to go with the data all fully loaded.
Motorhome Dual Tyre Inflation - My Portable Solution
Many people have experienced problems with motorhome tyre inflation caused generally by the higher inflation pressures required and also in my case by problems of access to tyre valves caused by twin rear wheel configurations. I wanted to solve this problem and I wanted my solution to allow me to inflate and check tyres independently no matter where I am so I needed to be "garage independent" and for my inflation solution to be based on a portable 12V compressor.
Some while ago I purchased a RING RAC900 compressor which allowed me to inflate car and motorhome tyres to the required pressures (it inflates up to 100psi) and it provided me with a screw-on valve connection which also allowed controlled tyre deflation if that was required, here are some photos of the original RING RAC900 equipment.
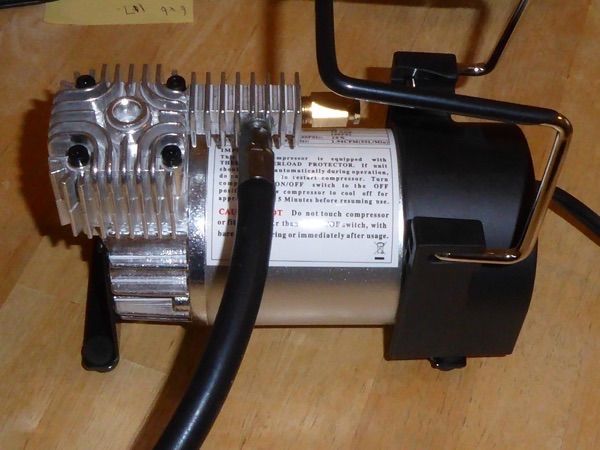
Fig 1

Fig 2
The RING RAC900 is well built and has performed well, it connects directly to the battery using crocodile clips rather than the cigarette lighter socket style connection, this is because the compressor has a maximum amperage of 23A which is higher than many cigarette style sockets are rated for.
The screw-on valve connection is Ok for many requirements but I wanted to be able to use a twin hold-on style connector so that I could access the valves on my motorhome twin rear wheels and also wanted to be able to use a Euro style valve connector rather than fiddling around having to screw a connector on and off all the time. I wanted to be able to just quickly and securely clip onto the valve or use a hold-on connector.
I approached Pneumatic Components Ltd (PCL) who are based in Sheffield with my problem and found them extremely helpful. Talking it through with them the best option, to also allow me to continue to use the existing screw connection if I wished to, was to cut the existing black hose (Fig 2) at it's mid point and form a mini-coupling joint at that point. Once that was done further mini couplings could be aded to allow me to attach a new twin hold-on connector, a Euro style tyre valve connector OR my original screw-on connector.
I ordered up the required parts for the job and they were impressively delivered the following morning. Below is a list of the parts I ordered, I already had a roll of PTFE tape but apart from that this is the list of things needed to adapt the RING RAC900 to increase it's flexibility in use.
JC9512 Jubilee® Hose Clips Size 000 - 9.5-12 mm 1 Box of 10, only 2 needed.
C08T73 Euro Style Tyre Valve Connector x1
CO1A03 Twin Hold-on Tyre Valve Connector x1
AC11CM Mini Coupling Socket G 1/4 Male Thread x2
AA11CF Mini Adaptor Plug G 1/4 Female Thread x1
HC1205 Male Hose Tail Adaptor R 3/16 for 4.75mm (3/16") bore hose x2
AC11CF Mini Coupling Socket G 1/4 Female Thread x1
Having cut the black hose in Fig 2 at it's mid point and installed the hose tail adaptors (sealing the joints with the PTFE tape), mini coupling socket and mini adaptor plug I then had the arrangement below which allows me to connect whichever configuration I want to the RING RAC900 via the mini adaptor plug now shown installed on the right:
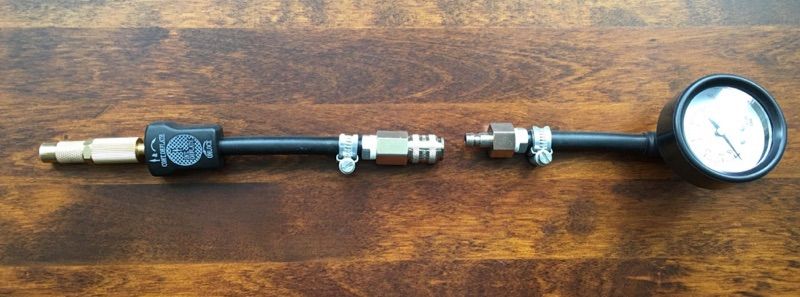
Fig 3
It was a simple matter to fit the required mini coupling sockets to the Euro style connector and the Twin hold-on connector and lo and behold I then had three valve connection options for my RING RAC900. This allows me to check and inflate my car or motorhome tyres no matter where I am without having to look for a tyre dealer with equipment that can inflate to the required pressures. The options look like this:
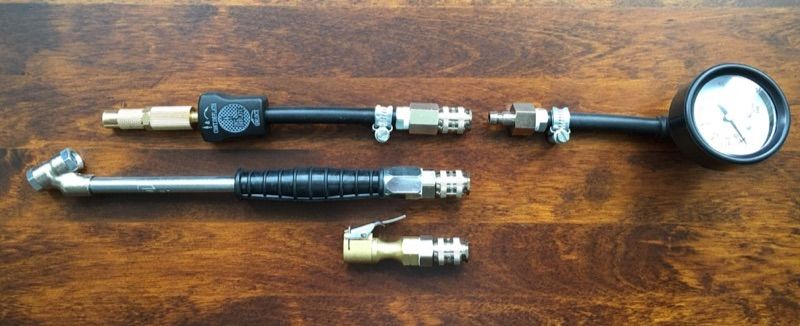
Fig 4
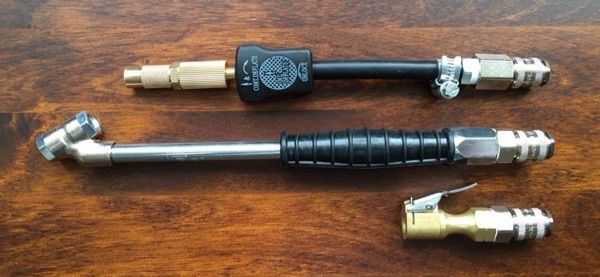
Fig 5
I've had the chance to test this system out and it works perfectly and delivers exactly what I require. I very much appreciate the generous and helpful advice and expertise provided by Owen at PCL, if you feel that this arrangement would help you then all the components required and listed above can easily be ordered on line at the PCL Online Store. This setup, for me at least, makes the RING RAC900 far more flexible and useful and the PCL products are of an excellent build quality.
Simple Handwritten Note Indexing - Evernote
This may or may not be of interest but it’s a simple little technique I’ve been using in Evernote when I want to store something handwritten. If you make a lot of handwritten notes, a student maybe, this approach may be a useful tip if and when you need to find things in handwritten material. If you take a full page of notes it is surprising, if you actually check each word, how FEW of them are actually useful in terms of search, what is important is to be able to quickly, easily and accurately identify the words that DO matter and make sure they can be easily searched and retrieved in the future.
If you scan a page of handwritten text and save it as a PDF file the words within the page will NOT be recognised by Evernote, if you save the file as a JPEG file words WILL be recognised within the page by Evernote but if material is handwritten the accuracy of the search is very dependent on the handwriting. What needs to be done is for important keywords to be identified and made readable. This does not apply to typewritten documents that have been scanned as PDFs as the words in those will always be recognised and indexed by Evernote, this is just to deal with handwritten notes.
What I do, as I am writing, if I write a word that I may want to search on later I place a small "x" next to it and a small "." at the side of the page for each word, it’s rare that there are more than 5-10 such words on each page, surprisingly few. So, when the page is complete and when it comes to scan and save a page of handwritten notes I scan the page as a JPEG and drop that into Evernote in the usual way, here is a sample I did when I was testing this, you can see the "x" "." marks.
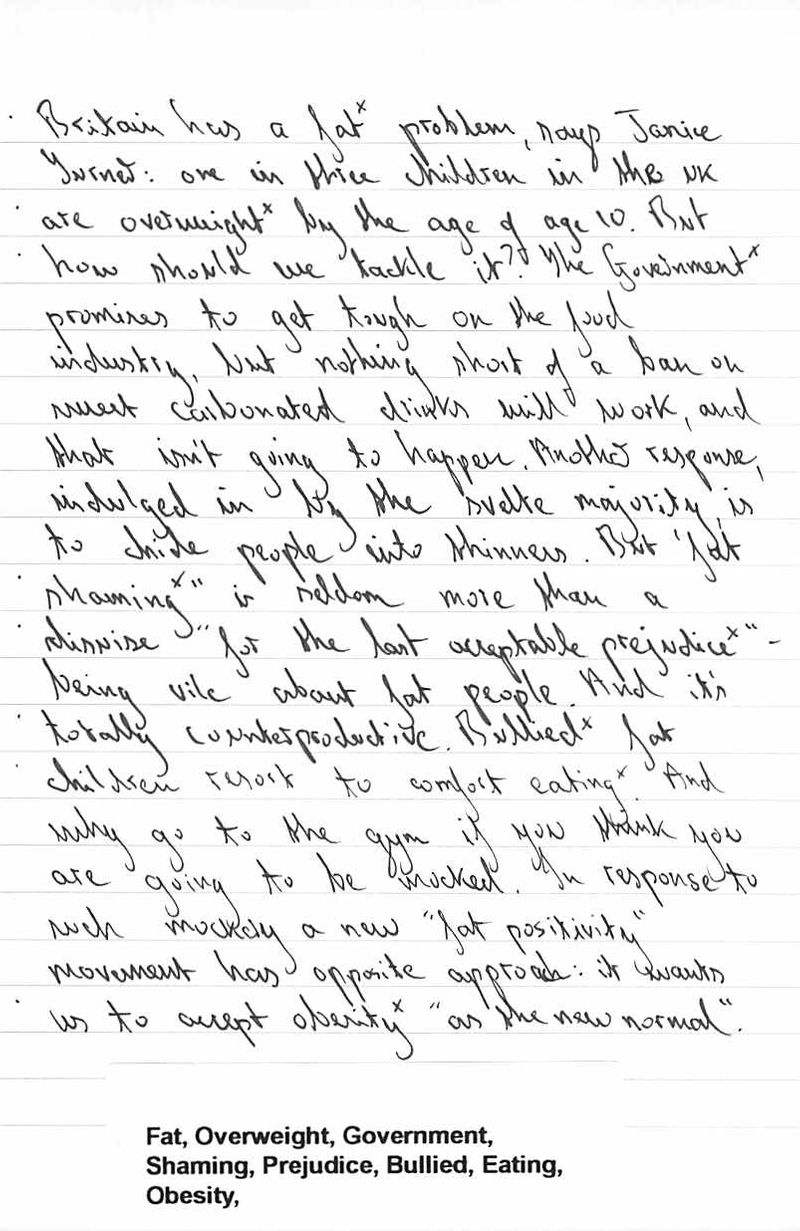
Once that is in Evernote you just look at the lines with a dot or dots on and then find the words marked "x". Then type just those words onto a label or directly into Evernote. Doing this makes it CERTAIN that if any of those terms are searched for in the future that handwritten note will be pulled out. This means that you very quickly have the words that matter reliably searchable without having to type out everything and without the risk of handwritten notes being incorrectly searched because of the handwriting.
I’ve found it works really well and it really is amazing how few words you actually need to type out and using the "x" and "." method as you write means you don’t have to read the whole thing in order to quickly and easily find the important words to type out. You can find the words that matter in seconds and type them out just as quickly.
Instead of using the "x" and "." method one could always write the "important" words in red or something like that, if one could be bothered to swap pens! The important thing is that the words need to be quickly and easily visible so that they, and they alone, can be later typed in as keywords.
A further advantage of this approach, apart from it's speed and simplicity, is that the JPEG file sizes generated by this method are very small indeed, which is not the case with some of the page scanning systems I've tried.
Back To The Old Ways
Over the last few years I've started to become pretty sick and tired of a lot of the "modern" ways of doing things.
I just hate telephoning a company and almost invariably not getting through to a person but just having to select from endless lists before finally getting cut off just as I think I'm getting somewhere.
I'm sick and tired of finally contacting an organisation only to find that the person I get through to can't deal with things, being given a promise that someone will be in touch, only to find that I hear nothing and have to start again.
I've had enough of sending emails into the ether to hear nothing for ages and to have to go through the whole procedure again or even worse to have to make that telephone call.... Select option 6..... Sorry, there is nobody available to take your call...
So I decided, where I could, to change things and to write letters. Yes, I type something out, print it, sign it, put it in an envelope with a stamp on it, post it and forget it. I even do this if all I want is the right person to contact me, it shifts the effort from me to "The Company".
It's been great, I find that almost invariably the right person gets back to me or the problem is just resolved without further contact and I hear no more. Going back to the old ways has really been a help to me, maybe it's just the novelty value of people receiving a hand signed letter, who knows, but it's worth a try.
TomTom GO Camper - Speed Limits - Large Camper
I fairly recently bought one of these units as it appeared to offer many attractive features in particular the "Large Camper" specific features, WiFi updates and a potentially useful smartphone application.
I have now been using the unit for a while and one particular problem (apparent deficiency) troubles me and that concerns the fact that the unit DOES NOT provide vehicle specific speed limit and speed limit warning information. Basically the unit will tell you the speed limits and warn you of them as if you are driving an ordinary car, even though you may well be driving a motorhome governed by completely different speed limits.
I have tried to get to the bottom of this, assuming that such an obviously important feature MUST exist and that I was doing something wrong but following lengthy communication with TomTom support these are my findings.
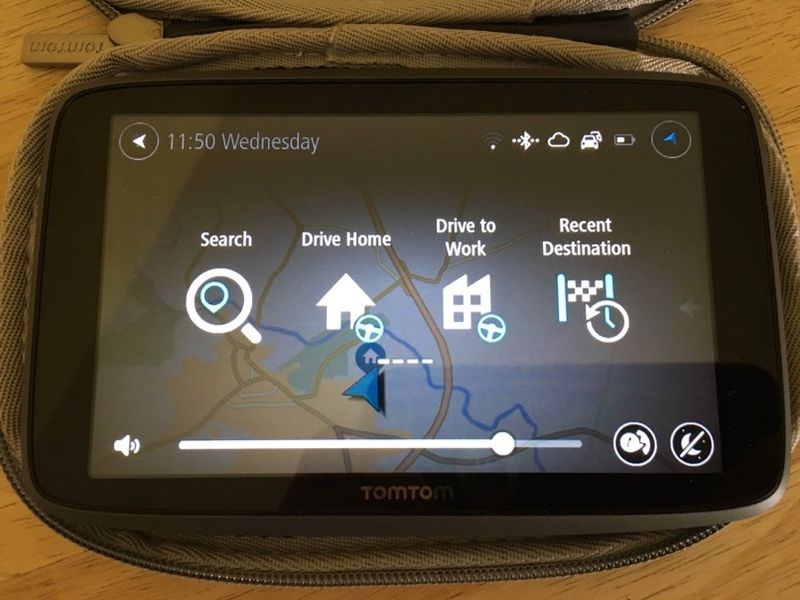
I am sorry to say that my fears have now been confirmed by TomTom Support (Call Ref: 180616-000397).
I can confirm that if you enter your vehicle dimensions the TomTom GO Camper WILL NOT take these into account when displaying speed limits and providing speed warnings so if this is important to you you should avoid this unit. The Garmin equivalent units (770 LMT-D or 660 LMT-D) do offer this functionality.
So, driving along a UK single carriageway road the National Speed Limit for a car is 60mph and the National Speed Limit for a large camper is 50mph. If you are using the TomTom GO Camper with the "Large Camper" settings enabled the speed limit and warnings displayed will be as for a car, 60mph, even though the speed limit for your vehicle is 50mph.
You can therefore drive along breaking the speed limit for your vehicle and you will receive no warning or indication of this fact from this unit.
I have now taken the decision to return this unit and accept a full refund and it is in the post to TomTom HQ. I would find this data inaccuracy annoying on an ongoing basis and have decided to continue with my Garmin 660 LMT-D. Additionally, and for no apparent reason, the TomTom has randomly crashed during use and has needed to be restarted, this had also happened to at least one other user known to me and this is not acceptable.
Another Airline Rip-Off
It's the little sneaky things that annoy me when prices go up, much more than the bigger obvious things.
We've always quite enjoyed flying with Jet2 to Mallorca and have had no major problems. On our early outward flight instead of messing about with breakfast we have generally enjoyed a toasted ham and cheese sandwich which used to come with a "free" packet of crisps.
In the last 12 months things have changed in terms of pricing, here are the details:
In April 2017 a toasted ham and cheese sandwich was £3.95p and a "free" packet of crisps was also provided with it so the total cost was £3.95p.
In April 2018 a toasted ham and cheese sandwich on the same route will cost £4.20p and a packet of crisps will no longer be included, it will be available for an additional charge of 30p so the total cost would be £4.50p.
It doesn't take a genius to work out that for the same snack meal this represents an increase in the cost of almost 14% at a time when the current general inflation rate is below 3%.
Thanks for that Jet2, sadly all this does is annoy people and encourage them to not buy things on the plane. The answer is of course simple, if you feel you are being ripped off simply take a snack meal with you which is allowed as long as you are not taking liquids.